

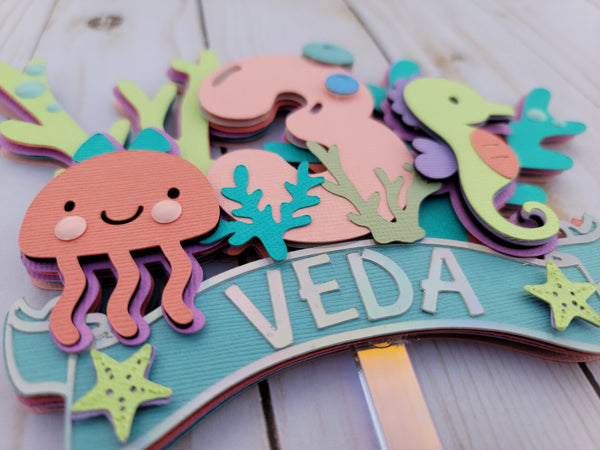
I have been meaning to make an Under the Sea themed cake topper for some time now. I have actually attempted it multiple times but something was always missing. You wanna know what was missing? The colors were always off! Not this time, though.
I made this entire cake topper using a selection of Bazzill cardstock paper and holographic paper from 12x12 Cardstock Shop. In addition to the colors being totally on point, the quality and texture of the paper is incredible. The small hints of holographic paper make this extra special, as well.

Supplies:
- Double Sided Adhesive Foam Dots/strips
- Echo Park Paper Co. Enamel Dots
- Bazzill Whirlpool
- Bazzill Wild Pansy
- Bazzill Evening Surf
- Bazzill Limeade
- Bazzill Capri Sea
- Bazzill Limeade
- Bazzill Coral Cream
- Bazzill Arroyo
- Bazzill Rainbow Holographic
- American Crafts Orchid
- Hot glue
I used Cricut Design Space for my images but you can use any images available to you. I like to use layered svg files so that I can build up the images for a cool 3D effect but there are ways to achieve that without a layered file. (Keep reading to learn more about that.) From Cricut, I used Seahorse #M3841D, Starfish #M39229, Octopus #M43A67, Bubble #M3E3FB, Banner #M8DB16E6, Seaweed #MB34FCFF, Coral Silhouette #MC19C23B, Equinox Font and Glowworm Font.

If you are using Design Space, arrange your images as you will want to assemble them on your canvas. Once you're satisfied, group them together and duplicate it. Weld the duplicated cake topper so it’s one solid cut. This will be the backing to your cake topper. I like to layer x4 backing pieces behind my cake topper. I do this because 1) it adds durability and depth to the topper, and 2) it’s a nice way to conceal the cake stick.
The next few steps are totally optional as you do not have to add all the extra layers like I do. However, if you want to layer your topper like me, duplicate your welded backing two more times so that you have three of the same backing pieces.
Now, pull one of the backings to the side so its separate from the other items on your canvas. Insert a square shape onto your canvas. Drag the square to the backing piece that you’ve set aside. Unlock the dimensions and make the square a long, thin rectangle. My rectangle is .4” wide but yours can be smaller depending on the cake stick you choose to use. I opted for a popsicle stick so mine is much wider than a normal cake stick. Align the rectangle to the center base of the cake topper (see above). Highlight your square + your backing layer and slice. Now you have a precut space for your cake stick to go! Duplicate this layer one more time so that you have two of them. If you find this a bit confusing, go to my Instagram account @Pineandpartyco and go to my 12x12 tab. I made a quick tutorial video for you all to help with any confusion!

Once this step is done, cut all your pieces! If you are free-handing the topper without design space, making those slices for where the cake stick goes will be a lot easier. First, though, assemble your pieces on one of the precut backing pieces.
You’ll want to glue down your larger seaweed cut outs first because these are meant to be displayed in the background. Next, assemble your octopus, seahorse, and number. Use foam adhesive between each layer.
If you want to layer them but you don’t have a layered file to work with, I have a tip for you! Just take your image and trace it onto a sheet of cardstock. Cut the shape out and use it as a layer behind your image. I would recommend adding 2-3 layers behind each image so it pops out.

For reference, the seahorse I used has 4 layers, the octopus has 3 layers, and the number has 2 layers. I added a video to my Instagram account as well if you’d like to see how that version came to be.

Attach your assembled characters on top of your seaweed using more 3D foam adhesive. Glue your small seaweed on top of your number. Use glue or 3D foam to attach a couple bubbles on the topper. Lastly, customize the topper with a name and voila!
-Naomi


Beautiful work that you do, congratulations
Do you only work with cricut? As a silhouette user those images are not available.
Absolutely gorgeous project! Thank you for sharing!
Very nicely done! Thanks for sharing.
Leave a comment