
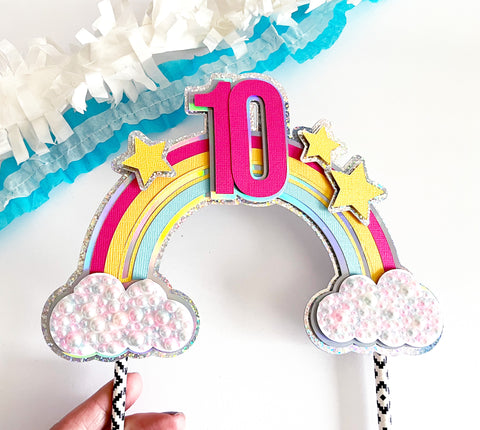
I'm primarily a card maker, but I have been so inspired by all of the paper cake topper ideas from some of the 12x12 Cardstock Shop Design Team members, that I decided to try my hand at one. My niece had a birthday and her grandma made a rainbow layered cake, so I knew just what to choose for my cake topper design. This rainbow cake topper is a fun way to celebrate someone special.
Download Rainbow Cake Topper SVG Files
If you are a Cricut or Silhouette user, you can download the free SVG files for this cake topper HERE. It includes all of the numbers 1-12.
Rainbow Cake Topper Supplies
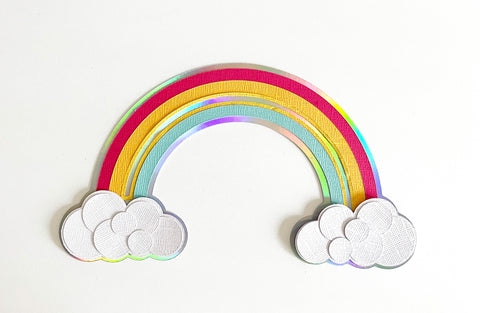
- Encore Textured Cardstock in Hot Pink, Honey Bear, Sea Mist, Snowy White
- Core'dinations Couture in Five Star
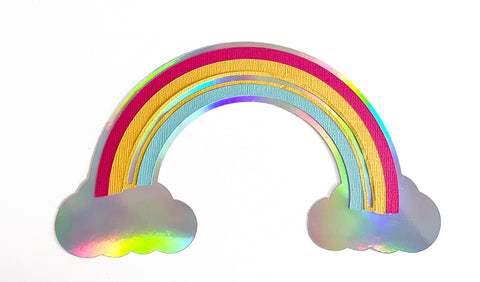
- Mirri Rainbow Holographic Cardstock
- Silver Confetti Sparkles Holographic Cardstock
- Unicorn Mixed Size Pearl Embellishments
- Foam Adhesive Squares
- Paper Straws
After analyzing lots of cake toppers, I think what makes them most special is all of the layering. I tried to keep my cake topper design simple so it's more of a cake topper for beginners, but I still wanted to get the layered look, so I made sure to include that.
Cricut Design Space Tutorial
(We are going to add the numbers you have chosen to the back shadow layer. You can skip this if you'd like. )
Let's take a little assembly pause for a Cricut Design Space tutorial. We are going to create an additional shadow layer for the number you are using. The file includes numbers 1-12, so once you have chosen the number you need, you can delete all others.
Ungroup the file, then ungroup the rainbow.You have to ungroup a few times until you can move all of the rainbow pieces around individually.

Position the numbers you'd like to use onto the rainbow, centered.

Select just the outer shadow of the numbers you are using (the bright green layer), then use the offset tool to make another shadow layer. You can drag the slider until the shadow layer is as big as you'd like, then hit apply.


Rainbow Cake Topper Assembly Instructions

Now we are ready to assemble. Cut out all of your pieces. There are two base rainbow pieces. One is larger than the other and is the very back piece. Set that aside for now.
Grab the rainbow layer that is slightly smaller and begin placing your rainbow colors on the rainbow base.
Add the stars to the shadow layer using foam adhesive to pop them up, but don't adhere them to the rainbow yet.
Add your chosen numbers to their shadow layer.

Next layer your assembled rainbow onto the back rainbow shadow. This will now guide you where to place the stars since there is a shadow layer. Go ahead and add them. Also add your numbers. If you have created a shadow layer, line them up.
Next let's work on the clouds. There are two options.
Option 1 is to layer the cut out circles to make bubble clouds. Use the shadow layer to determine where to place them. I recommend laying them all out to figure it out first and then adhering them all.
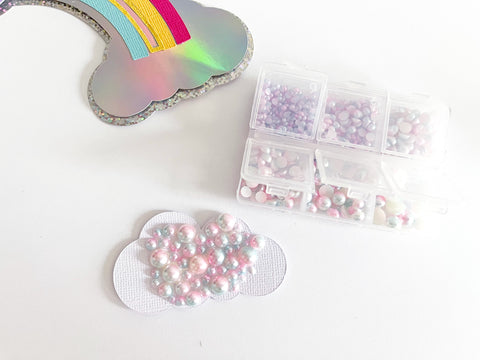
Option 2 is to use our pearl rhinestones and layer them onto the cloud shadow layer. This is time consuming but fun. I used the Unicorn Pearl Kit for this and just started in the center and began placing them next to each other, working my way out.
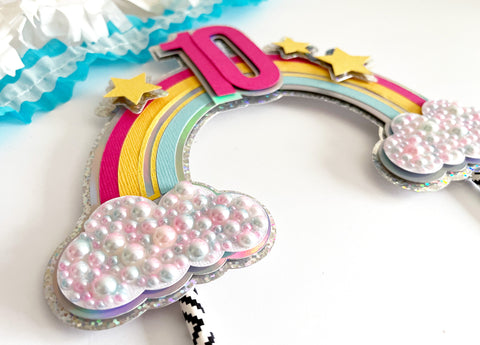
Whatever cloud option you choose, finish up the clouds and adhere to the topper.
Flip over your cake topper and hot glue paper straws to the back for a stand.
-Michelle
Here's another one of our favorite cake toppers.
4 comments
Recent Blogs
Featured Blogs
Categories
3D Paper Projects
4th of july
Acetate
Adhesive
American Crafts Cardstock
Baby
Back to school
Banners
Bazzill
Birthday
BoBunny
Cake Topper
Card Making
Card Templates
Cardmaking
Cardstock
Carta Bella
Christmas
Core'dinations Cardstock
Crafts For Kids
Cricut
Cricut & Silhouette Crafting
Cutting Tips
DCWV
Deisgn Team Member Monica Rodriguez
Design Team Member Amanda Lace
Design Team Member An Pham
Design Team Member Annie Chinoy
Design Team Member April Gonzalez
Design Team Member Brenna
Design Team Member Carrie
Design Team Member Cherie Dalton
Design Team member Christi Steinbeck
Design Team Member Jannet Furman
Design Team Member Jessica Perez
Design Team Member Joselyn Sierra
Design Team Member Kandce Johnson
Design Team Member Kandice Johnson
Design Team Member Kate Deignan
Design Team member Kathleen Eifert
Design Team Member Manasa Vavilapalli
Design Team Member Michelle Price
Design Team Member Naomi Krush
Design Team Member Pam Giles
Die Cutting
Dimensional Paper Projects
DIY
Doodlebug Designs
Dreaming Tree
Easter
Echo Park
embellishments
Encore Cardstock
Envelopes
Fall
Father's Day
Foil Cardstock
Foil Quill
From the Owner Lynette
Fun Fold
Genealogy
Gifts
Glama Translucent Vellum
Glitter Cardstock
Graduation
Halloween
hat
Holographic Cardstock
Masculine Crafts
Memento Ink
Mini Album
Mirri Cardstock
Mother's Day
mulberry paper
Neenah Classic Crest
Neenah Stardream
New Years Eve
Paper Craft Tips
Paper Flowers
Paper Party Decor
Paper Piecing
Paper Tags
Paper Weight
Patriotic
Patterned Paper
Princess
Rubber Stamping
Scrapbook Layout
Scrapbooking
Scraps
Shaker Card
Silhouette
Simple Stories
Sirio Cardstock
Skin Tone Cardstock
Spring
St. Patrick's Day
Stamping
Summer
SVG
Teacher Appreciation
Technical Info
Teens
Thanksgiving
Tutorial
Valentine's Day
Vellum
Video
Wedding
Winter
Woodgrain Paper


What a great project! Thanks again, for the files.
This is such a great project! And luckily for me, my granddaughter is turning 10. :-)
Can’t wait to have a birthday to celebrate. This will really add to the occasion!
This is beautiful! I am definitely going to make it for my granddaughter’s birthday, she’ll be so excited. Thank you!
Leave a comment