

Let’s talk about butterflies! Paper butterflies! I have become known for 3D butterflies in the crafting community and a lot of my amazing followers constantly ask for 3D butterfly tutorials.
Why are they so popular? Simple. They are beautiful and make any crafting project look delicate! They look detailed and complicated, but they are quite easy to make. So let’s jump into the tutorial so you can create your own beautiful 3D butterflies.
The way we will be doing these 3D butterflies can apply to any file that you can find on any design space/studio. I am using Cricut Design Space SVG #MB0D07D0, but you may use any file of your choice. Just make sure to grab a butterfly that has two different cuts; one with the intricate cuts and another completely contoured solid piece. If you have a file that only has the intricate cut file, but not the fully contoured file, you may just duplicate your intricate cut file and contour it yourself.

After we have our files uploaded, we can start resizing the intricate cut and the completely contoured file to 3 inches wide. After we resize them, we can grab the completely contoured file and duplicate it two more times.
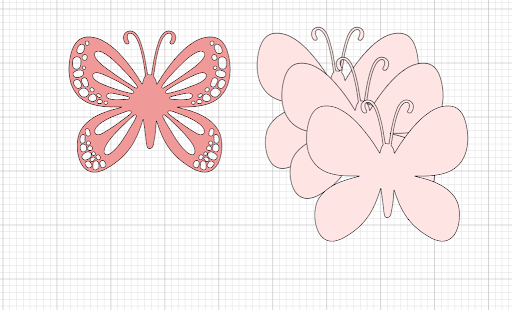
We will now focus on our 2 duplicates and resize each one of them into different sizes. Since we started at 3 inches, we want to resize each of the duplicates to an inch bigger. So one of our duplicates will be resized to 4 inches wide and our second duplicate will be resized to 5 inches. You may add more layers, just make sure when you do, you resize that duplicate an inch more (so 6 inches, 7 inches, etc). You may also start off bigger! So if you resized your butterfly at the start to, for example, 6 inches instead of 3 inches, then your duplicates will be 7 and 8 inches wide.

Now comes the exciting part! Choosing our colors and papers!
For these butterflies I decided to go for different shades of pinks from the Bazzill line and gold glitter cardstock. I used Bazzill Berry Blush, Cotton Candy, and Tutu Pink. For my gold glitter cardstock I used Chunky Gold Glitter from American Crafts. I went ahead and changed the color of my files to make sure each butterfly gets cut a different color.

After we have prepared our files we can go ahead and cut them! So, all four layers will make one beautiful 3D butterfly! You should have two 3”, one 4”, and one 5” cutout.

Let’s start assembling our butterfly. We want to start by grabbing our biggest cutout which in my case it is the 5” one. We also want to grab the next size down which for me it will be the 4”. Let's start adding glue behind our 4” butterfly in the center.

After we have added our glue behind our butterfly, we will now attach it well centered on top of our 5” butterfly.

After we have added our glue behind our butterfly, we will now attach it well centered on top of our 5” butterfly.

We will then repeat the process for the rest of the layers!

Now the final step is to fold the first three layers of the butterfly wings inwards. When we do this process, we do not want to include the wings from the very bottom, the biggest cutout which is our base. We only want to fold the first three layers. We can do this by grabbing all 3 wings and folding them gently inwards to the center.

Don’t forget to do it to the opposite side! After we have folded our butterfly, you may fluff it out just how you want. You should end up with a beautiful 3D paper butterfly!
Remember that you may do this method to any butterfly, dragonfly, or bee cutout you wish to do. Can’t wait for you to try making your own beautiful 3D butterflies
-Liz


14 comments
Recent Blogs
Featured Blogs
Categories
3D Paper Projects
4th of july
Acetate
Adhesive
American Crafts Cardstock
Baby
Back to school
Banners
Bazzill
Birthday
BoBunny
Cake Topper
Card Making
Card Templates
Cardmaking
Cardstock
Carta Bella
Christmas
Core'dinations Cardstock
Crafts For Kids
Cricut
Cricut & Silhouette Crafting
Cutting Tips
DCWV
Deisgn Team Member Monica Rodriguez
Design Team Member Amanda Lace
Design Team Member An Pham
Design Team Member Annie Chinoy
Design Team Member April Gonzalez
Design Team Member Brenna
Design Team Member Carrie
Design Team Member Cherie Dalton
Design Team member Christi Steinbeck
Design Team Member Jannet Furman
Design Team Member Jessica Perez
Design Team Member Joselyn Sierra
Design Team Member Kandce Johnson
Design Team Member Kandice Johnson
Design Team Member Kate Deignan
Design Team member Kathleen Eifert
Design Team Member Manasa Vavilapalli
Design Team Member Michelle Price
Design Team Member Naomi Krush
Design Team Member Pam Giles
Die Cutting
Dimensional Paper Projects
DIY
Doodlebug Designs
Dreaming Tree
Easter
Echo Park
embellishments
Encore Cardstock
Envelopes
Fall
Father's Day
Foil Cardstock
Foil Quill
From the Owner Lynette
Fun Fold
Genealogy
Gifts
Glama Translucent Vellum
Glitter Cardstock
Graduation
Halloween
hat
Holographic Cardstock
Masculine Crafts
Memento Ink
Mini Album
Mirri Cardstock
Mother's Day
mulberry paper
Neenah Classic Crest
Neenah Stardream
New Years Eve
Paper Craft Tips
Paper Flowers
Paper Party Decor
Paper Piecing
Paper Tags
Paper Weight
Patriotic
Patterned Paper
Princess
Rubber Stamping
Scrapbook Layout
Scrapbooking
Scraps
Shaker Card
Silhouette
Simple Stories
Sirio Cardstock
Skin Tone Cardstock
Spring
St. Patrick's Day
Stamping
Summer
SVG
Teacher Appreciation
Technical Info
Teens
Thanksgiving
Tutorial
Valentine's Day
Vellum
Video
Wedding
Winter
Woodgrain Paper


LeeAnne-
#MB0D07D0 is working for me. Use the # and those are zeros, not letter Os. I hope that helps you find it. You can also try searching for butterfly and find it. This one has those unique hooked antennae to help identify it.
this design doesn’t show up – used #MB0D07D0 with & without the hashtag….
Medelene- When you search make sure you are logged into design space and have the # in front of the number in the search bar.
I love the butterfly in the tutorial. However, I searched for it in design space and could not locate it.
Great tutorial! So easy to follow. Thank you!
Leave a comment