

Since everyone I give gifts to knows I'm a papercrafter, I feel pressure to have the cutest gift bag or the cutest card to give. Anyone else feel like this? LOL
Here's a fun little project that will wow the recipient and use up some of your paper stash. This gift bag topper tutorial will show you how to dress up a plain gift bag.
Supplies needed:
- 8" x 10 1/2" gift bag
- 1 - 9" x 12" sheet cardstock
- 1- 12" x 12" sheet cardstock
- 1- 3 1/2" x 7 1/2" sheet cardstock
- Various scraps for paper blooms
- Ribbon or crepe paper
To begin, start with a piece of 9" x 12" cardstock. For my bag topper I used the Doodlebug Design Dot & Stripe Paper Pack. I love these Doodlebug Design paper packs because they coordinate so nicely and have subtle patterns that add interest, but don't overwhelm your project!

Score your paper 2" in from each side. This creates a center rectangle that will be the top of the topper and 2" flaps all around that will become the sides.

With your paper lying with the longest edge on top and bottom, snip the flaps from the edge to the center rectangle according to the picture.

Next we need to create the hole for the handles. With your paper still lying with the longest edge on top and bottom, measure in 3 5/8" of an inch from each short side and score or mark that point along the scored edge. You will now cut a rectangle that runs from that 3 5/8" score line, along the long scored edge to the next 3 5/8" score line, then in 1/2" and back to the original 3 5/8" score line. Repeat on the opposite side.

Next add your layer pieces. The 3 1/2 x 7 1/2" sheet of cardstock will be the bottom layering piece (teal on my example). You will then cut your 12 x 12 sheet of cardstock into the following pieces (pink in my example):
- 1 - 3 1/4" x 7 1/4"
- 2- 1 3/4" x 4 1/2"
- 2 - 1 3/4" x 7 1/2"
Adhere your layers onto the bag topper.

Now it's time to make those paper blooms. There are lots of templates and tutorials online, but I used these templates from Paper & Peony. She's got PDF templates to trace and cut out, or free SVG files to download. I'm not a paper flower expert, but it was fun to play around with them. I had the best success with cutting the template pieces out at varying sizes and then curling the edges and layering them up.
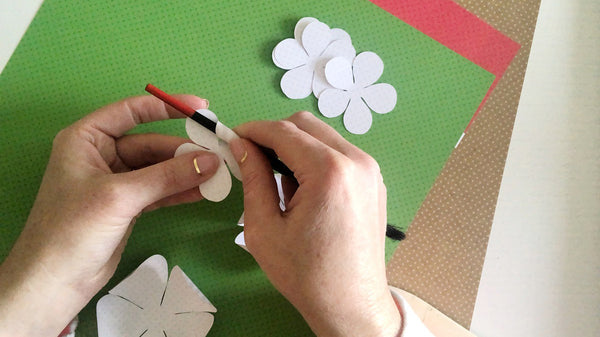
To curl the edges you can use a bone folder or the end of a pencil or paintbrush. Holding the paintbrush end against the petal with your thumb and applying pressure as you drag it along the petal, will give them a natural cup shape. You can also roll the edges around a smaller paintbrush for a more defined curl.
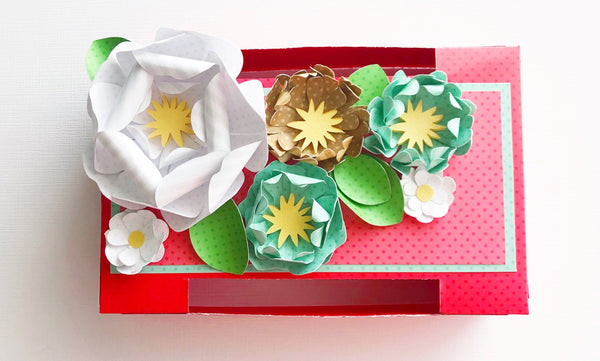
Adhere your blooms to the top of your topper. Finish it off by glueing crepe paper, ribbon, lace or whatever you have on the inside edge of the topper to create a trim.

The bag topper slides on top of your gift bag and you are ready to gift it to someone special.
-Michelle

1 comment
Recent Blogs
Featured Blogs
Categories
3D Paper Projects
4th of july
Acetate
Adhesive
American Crafts Cardstock
Baby
Back to school
Banners
Bazzill
Birthday
BoBunny
Cake Topper
Card Making
Card Templates
Cardmaking
Cardstock
Carta Bella
Christmas
Core'dinations Cardstock
Crafts For Kids
Cricut
Cricut & Silhouette Crafting
Cutting Tips
DCWV
Deisgn Team Member Monica Rodriguez
Design Team Member Amanda Lace
Design Team Member An Pham
Design Team Member Annie Chinoy
Design Team Member April Gonzalez
Design Team Member Brenna
Design Team Member Carrie
Design Team Member Cherie Dalton
Design Team member Christi Steinbeck
Design Team Member Jannet Furman
Design Team Member Jessica Perez
Design Team Member Joselyn Sierra
Design Team Member Kandce Johnson
Design Team Member Kandice Johnson
Design Team Member Kate Deignan
Design Team member Kathleen Eifert
Design Team Member Manasa Vavilapalli
Design Team Member Michelle Price
Design Team Member Naomi Krush
Design Team Member Pam Giles
Die Cutting
Dimensional Paper Projects
DIY
Doodlebug Designs
Dreaming Tree
Easter
Echo Park
embellishments
Encore Cardstock
Envelopes
Fall
Father's Day
Foil Cardstock
Foil Quill
From the Owner Lynette
Fun Fold
Genealogy
Gifts
Glama Translucent Vellum
Glitter Cardstock
Graduation
Halloween
hat
Holographic Cardstock
Masculine Crafts
Memento Ink
Mini Album
Mirri Cardstock
Mother's Day
mulberry paper
Neenah Classic Crest
Neenah Stardream
New Years Eve
Paper Craft Tips
Paper Flowers
Paper Party Decor
Paper Piecing
Paper Tags
Paper Weight
Patriotic
Patterned Paper
Princess
Rubber Stamping
Scrapbook Layout
Scrapbooking
Scraps
Shaker Card
Silhouette
Simple Stories
Sirio Cardstock
Skin Tone Cardstock
Spring
St. Patrick's Day
Stamping
Summer
SVG
Teacher Appreciation
Technical Info
Teens
Thanksgiving
Tutorial
Valentine's Day
Vellum
Video
Wedding
Winter
Woodgrain Paper


What a great idea! Flower decorations look great, could easily be changed to many different themes. Thanks for sharing.
Leave a comment