Kate here, with a SUPER SIMPLE fun fold tutorial to set your cards apart from the rest! Today I'll be sharing with you a dutch door fold card tutorial.
Supplies:
- Marshmallow Bazzill Card Shoppe
- Snowflake paper from Echo Park Hello Winter Kit
- Stamps and dies from Taylored Expressions
Start with a side folding A2 card (4 1/4" x 5 1/2"). This is the standard size you get when you cut a piece of 8 1/2" x11" cardstock in half.
Choose a piece of patterned paper and pre cut the layering sizes you'll need: 4" x 5 1/4" inches for behind sentiment panel (inside back flap of card), 4" x 2 1/2" inches for front flap (front side bottom flap), and 2" x 3" for layering behind the stamped snowman.

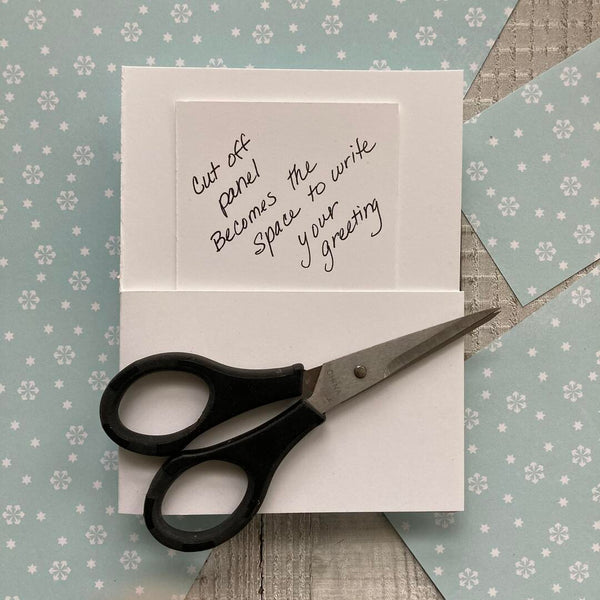
Next, you are going to cut off the upper half of the card front (just like a dutch door). Measure down 2 3/4" from the top and cut down along the fold and straight across.


Use a separate rectangle of cardstock (2 1/4" x 3 1/4") to build your focal image on the front of the card. Layer the patterned paper on top of this and then your stamped design.
I placed another solid rectangle on the back of this focal rectangle (on the inside of the card) to give it a more finished look, but you can layer this however you'd like!

I hope this dutch door fold card tutorial was helpful and that you are already dreaming up your own creations!
-Kate

8 comments
Recent Blogs
Featured Blogs
Categories
3D Paper Projects
4th of july
Acetate
Adhesive
American Crafts Cardstock
Baby
Back to school
Banners
Bazzill
Birthday
BoBunny
Cake Topper
Card Making
Card Templates
Cardmaking
Cardstock
Carta Bella
Christmas
Core'dinations Cardstock
Crafts For Kids
Cricut
Cricut & Silhouette Crafting
Cutting Tips
DCWV
Deisgn Team Member Monica Rodriguez
Design Team Member Amanda Lace
Design Team Member An Pham
Design Team Member Annie Chinoy
Design Team Member April Gonzalez
Design Team Member Carrie
Design Team Member Cherie Dalton
Design Team member Christi Steinbeck
Design Team Member Jannet Furman
Design Team Member Jessica Perez
Design Team Member Joselyn Sierra
Design Team Member Kandce Johnson
Design Team Member Kandice Johnson
Design Team Member Kate Deignan
Design Team member Kathleen Eifert
Design Team Member Manasa Vavilapalli
Design Team Member Michelle Price
Design Team Member Naomi Krush
Design Team Member Pam Giles
Die Cutting
Dimensional Paper Projects
DIY
Doodlebug Designs
Dreaming Tree
Easter
Echo Park
embellishments
Encore Cardstock
Envelopes
Fall
Father's Day
Foil Cardstock
Foil Quill
From the Owner Lynette
Fun Fold
Genealogy
Gifts
Glama Translucent Vellum
Glitter Cardstock
Graduation
Halloween
hat
Holographic Cardstock
Masculine Crafts
Memento Ink
Mini Album
Mirri Cardstock
Mother's Day
mulberry paper
Neenah Classic Crest
Neenah Stardream
New Years Eve
Paper Craft Tips
Paper Flowers
Paper Party Decor
Paper Piecing
Paper Tags
Paper Weight
Patriotic
Patterned Paper
Princess
Rubber Stamping
Scrapbook Layout
Scrapbooking
Scraps
Shaker Card
Silhouette
Simple Stories
Sirio Cardstock
Skin Tone Cardstock
Spring
St. Patrick's Day
Stamping
Summer
SVG
Teacher Appreciation
Technical Info
Teens
Thanksgiving
Tutorial
Valentine's Day
Vellum
Video
Wedding
Winter
Woodgrain Paper


Love your cards and the easy to follow instructions. Thank you.
Please add me to your site/I blog. I love the seay you gi and show how to makeca
Please add me to your site/ blog/ I don’t know what to call it but I LOVE your ideas!
Thank you
I LOVE your cards! & the ‘easy to follow’ directions! Some people share the directions in a way that is so difficult it becomes discouraging…. Your way encourages me… THANK YOU!
I love snowmen and I love making cards… this is a great design. Thanks.
Leave a comment